Have a stack of freshly crocheted granny squares sitting on your desk and wondering what to make with them next? Whether you just finished leftover squares from our viral Evermore Plaid Granny Square Blanket or want a fast weekend project, these granny square crochet ideas include exact square counts, folding diagrams, and step-by-step instructions!
If there is one universal truth in the crochet studio, it is that making granny squares is dangerously addictive. They fit effortlessly into a coat pocket, require zero pattern reading once your hands memorize the 4-corner rhythm, and turn leftover yarn skeins into colorful little tiles of art.
The problem? Most crocheters assume they need to make 150+ squares for a massive bed blanket before they can actually finish a project. In reality, you can transform as few as 1, 3, or 13 granny squares into heirloom bags, padded book sleeves, cozy throw pillows, and wearable cardigans in a single afternoon!
📋 Master Granny Square Count Cheat Sheet (By Project Type)
Before you start joining, use our studio reference chart below to see exactly how many 4.5-inch to 5-inch (4-round) granny squares you need for the 12 most popular granny square crochet ideas, along with total yardage and best yarn fiber:
| Project Idea | Number of 5” Squares | Total Yardage (#4 Yarn) | Best Yarn Fiber | Assembly Time |
|---|---|---|---|---|
| 1. Scalloped Mug Coaster | 1 Square | ~18 yards | 100% Dishcloth Cotton | 12 mins |
| 2. Folded Triangle Bandana | 1 Large Square + 2 Halves | ~85 yards | Soft DK / Worsted Cotton | 40 mins |
| 3. Boho Envelope Clutch / Pouch | 3 Squares | ~65 yards | Worsted Cotton or Acrylic | 45 mins |
| 4. Padded Kindle / Book Sleeve | 4 or 6 Squares | ~110 yards | Cotton-Acrylic Blend | 1 hour |
| 5. Fingerless Cozy Wrist Warmers | 4 Squares (2 per hand) | ~90 yards | Merino Wool / Acrylic Blend | 45 mins |
| 6. Structured Cube Desk Basket | 5 Squares (Bottom + 4 Sides) | ~140 yards | Bulky Cotton Cord or 2 Strands | 1.5 hours |
| 7. Bucket Hat (Crown + Brim) | 5 Squares + Round Crown | ~175 yards | 100% Mercerized Cotton | 2 hours |
| 8. Modern Crossbody Messenger Bag | 9 Squares | ~240 yards | 100% Worsted Cotton | 2.5 hours |
| 9. Classic Diamond Market Tote | 13 Squares | ~360 yards | 100% Unmercerized Cotton | 4 hours |
| 10. Reversible 16” Throw Pillow | 18 Squares (9 Front + 9 Back) | ~450 yards | Soft Acrylic-Wool Blend | 5 hours |
| 11. Patchwork Cropped Cardigan | 36 to 44 Squares | ~1,050 yards | Anti-Pilling Worsted Acrylic | 12 hours |
| 12. Evermore Plaid Throw Blanket | 30 Large + 184 Small | ~3,258 yards | Worsted Wool-Acrylic Blend | Weekend Project |
🧶 The 2 Essential Base Motifs: Classic Cluster vs. Solid Granny Square
Every project in this guide can be made using either the Classic Openwork Granny Square (vintage, breathable, and fast) or the Solid Granny Square (dense, modern, and ideal for unlined bags or plaid blankets). Here are the exact round-by-round studio recipes for both!
Recipe A: The Classic 4-Round Granny Cluster Square (5 Inches)
- Hook:
5.0 mm (US H-8) - Yarn: Medium Weight (#4) Cotton or Acrylic (~22 yards per 4-round square)
Make a magic ring.
- Round 1: Chain 3 (counts as 1st double crochet). Work
2 dcinto the magic ring, thench 2. Repeat*3 dc into ring, ch 2*3 more times. Pull magic ring tight and join with asl stinto the top of the beginning Chain-3. (Four 3-dc clusters separated by four ch-2 corner spaces). - Round 2: Turn your work over (turning after every round keeps your square 100% straight without twisting!). Slip stitch into the corner
ch-2space. Chain 3, work(2 dc, ch 2, 3 dc)into that same corner space.*Ch 1, work (3 dc, ch 2, 3 dc) into next corner ch-2 space*3 times.Ch 1, join with asl stto top of starting Chain-3. (24 dc). - Round 3: Turn work and
sl stinto corner space. Chain 3, work(2 dc, ch 2, 3 dc)in corner space.*Ch 1, work 3 dc in next ch-1 side space, ch 1, work (3 dc, ch 2, 3 dc) in next corner space*3 times.Ch 1, 3 dc in last side space, ch 1, join withsl st. (36 dc). - Round 4: Turn work and
sl stinto corner space. Chain 3, work(2 dc, ch 2, 3 dc)in corner space. Work3 dcseparated bych 1into each side space, and(3 dc, ch 2, 3 dc)into each corner around. Join and fasten off! (48 dc).
Recipe B: The Modern Solid Granny Square (No Gaps!)
If you are making a pencil pouch, book sleeve, or unlined tote bag where you don’t want small items peeking through cluster holes, use this solid variation (the exact motif used in our Evermore Plaid Blanket):
- Round 1: Make a magic ring,
ch 2(does not count as a st). Work*3 dc into ring, ch 2*4 times. Pull tight and join withsl stto firstdc. (12 dc). - Round 2:
Ch 2.*Work 1 dc in each of the 3 side sts, then work (2 dc, ch 2, 2 dc) in the corner ch-2 space*4 times around. Join withsl stto firstdc. (28 dc). - Round 3:
Ch 2.*Work 1 dc in each st across the side (7 sts), then work (2 dc, ch 2, 2 dc) in the corner ch-2 space*4 times around. Join withsl st. (44 dc). - Round 4:
Ch 2.*Work 1 dc in each st across the side (11 sts), then work (2 dc, ch 2, 2 dc) in the corner ch-2 space*4 times around. Join and fasten off! (60 dc).
🎒 3 Step-by-Step Granny Square Projects You Can Finish Today
Instead of just giving you inspiration photos, let’s walk through the exact assembly math for our top 3 reader-favorite granny square builds:
Project 1: The 3-Square Origami Envelope Pouch (Hook Case or Makeup Bag)
This clever geometric fold turns just 3 solid granny squares into a buttoned envelope pouch with zero fabric lining required!
- Crochet 3 Solid Granny Squares (4 rounds each, measuring 4.5 to 5 inches across) using 100% Worsted Cotton.
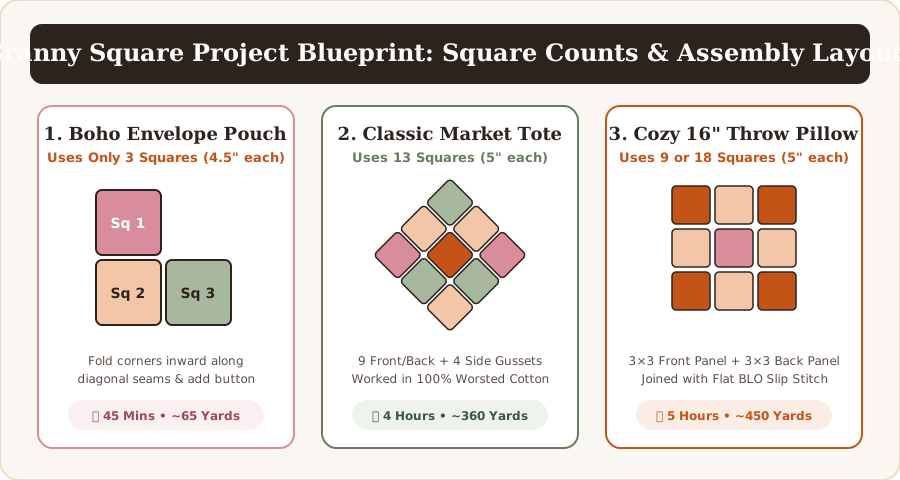
- Arrange in an “L” Shape: Lay Square 1 at the top-left, Square 2 directly below Square 1, and Square 3 to the right of Square 2 (as shown in Panel 1 of our blueprint chart above).
- Seam the “L” Together: Using a tapestry needle and whip stitch (or flat slip-stitch join), seam the bottom edge of Square 1 to the top edge of Square 2, and the right edge of Square 2 to the left edge of Square 3.
- The Envelope Fold:
- Fold the bottom-left corner of Square 2 diagonally upward toward the center.
- Fold the bottom-right corner of Square 3 inward over the front, and the top-right corner of Square 1 downward to create the pointed envelope flap!
- Seam the Side Pockets: Whip stitch along the two lower diagonal meeting edges, leaving the top triangular flap free to open and close.
- Add a Button Closure: Sew a 20 mm wooden button to the center seam of the front pocket, and use the natural corner
ch-2space of the top flap as your built-in buttonhole!
Project 2: The 13-Square Diamond Market Tote (“Bag of Happiness” Layout)
If you love our Beginner Crochet Tote Bag Pattern, you will adore this iconic 13-square boho market bag:
- Make 13 Granny Squares (5 inches each) in 100% Cotton Yarn.
- Create the Front & Back Diamond Panels:
- Arrange 9 squares into a
3 × 3grid, then rotate the entire grid 45 degrees so it sits on its point like a diamond. - Seam those 9 squares together into a single diamond panel.
- Arrange 9 squares into a
- Add the 4 Side/Bottom Gusset Squares:
- Attach the remaining 4 squares along the lower left and lower right diagonal edges of the 9-square diamond, folding them in half to link the front panel to the back panel!
- Add Reinforced Cotton Straps:
- Join yarn at the left valley of the top V-neck edge. Work 2 rounds of single crochet (
sc) up and down the diamond peaks to stabilize the top rim (working asc2togdecrease in each valley and3 scat each peak). - On Round 3, when you reach the top of the front-left peak, Chain 65 and anchor with a
scinto the front-right peak to form your first shoulder strap! Repeat on the back peaks, then work 3 rounds of solid single crochet over the entire rim and both handle chains.
- Join yarn at the left valley of the top V-neck edge. Work 2 rounds of single crochet (
Project 3: The 18-Square Reversible Farmhouse Throw Pillow (16” × 16”)
A standard 16-inch × 16-inch pillow insert requires a crochet cover that measures 15 inches × 15 inches unstretched (that 1-inch negative ease is the secret that keeps handmade crochet pillows looking plump and designer-grade instead of saggy!).
- Make 18 Squares (each measuring 5 inches × 5 inches blocked).
- Shortcut Variation: Prefer only making 9 squares? Crochet 9 decorative granny squares for the Front Panel, and crochet a simple solid back panel of 52 half double crochets × 38 rows!
- Join into Two 3 × 3 Panels:
- Arrange 9 squares into a
3 × 3square grid for the Front Panel and 9 squares into a3 × 3grid for the Back Panel. - Join each panel using the Flat Back-Loop Slip Stitch Seam (the exact invisible seam demonstrated in our Evermore Plaid Blanket tutorial).
- Arrange 9 squares into a
- Seam 3 Sides & Add Button Envelope Flap:
- Place the Front and Back panels with Wrong Sides facing each other.
- Single crochet through both thicknesses around 3 sides (Left, Bottom, and Right), working
3 scin each corner. - Insert your 16-inch pillow form through the open top edge, then work 1 row of single crochet with three
ch-3buttonholes across the top edge so you can easily remove the cover for washing!
🪡 Which Granny Square Joining Method Should You Use?
How you connect your squares dramatically changes the look and strength of your project:
| Joining Method | Visual Look | Seam Elasticity | Best Project Match |
|---|---|---|---|
| Flat BLO Slip Stitch Join | Flat, subtle braided ridge on back | Low stretch (very strong) | Tote bags, blankets & structured pillows |
| Single Crochet Ridge Join (RS) | Raised 3D textured grid frame | Medium stretch | Modern patchwork cardigans & boho throws |
| Invisible Mattress Stitch (Sewn) | 100% invisible seam | Medium stretch | Colorblock garments & plaid patterns |
| Join-As-You-Go (JAYG) | Seamless lacy cluster bridges | High drape & stretch | Lightweight shawls & scrap blankets |
❓ Frequently Asked Questions
Why do my granny squares twist as they get bigger?
When you crochet in the round without turning, every stitch leans slightly to the right (for right-handed makers). Over 5+ rounds, this causes the square to vortex or skew diagonally. The fix: Simply flip/turn your square over at the end of every single round—working odd rounds on the Right Side and even rounds on the Wrong Side cancels out the lean completely!
Do I really need to block granny squares before joining?
If your squares vary in size by even 0.25 inches, seaming them together becomes a battle and the finished bag or pillow will pucker. Pin your damp squares to identical dimensions (e.g., 5.0” × 5.0”) on a foam mat and let them air dry for 2 hours—your seams will line up stitch-for-stitch!
What is the best yarn for granny square clothing vs. bags?
- For Bags, Coasters & Baskets: Always choose 100% Worsted Cotton so the squares hold weight without stretching.
- For Cardigans, Sweaters & Blankets: Choose a Soft Worsted (#4) Acrylic or 80/20 Acrylic-Merino Blend so the garment drapes softly over your shoulders without feeling heavy.
🔗 Essential Related Crochet Guides
- 🛋️ Evermore Crochet Pattern: Free Plaid Granny Square Blanket: Ready for the ultimate heirloom granny square project? Make our viral 3-color woven plaid throw!
- 🧶 How to Make a Magic Ring (Step-by-Step Photo Guide): Master the gap-free center ring that keeps your granny squares from unraveling.
- 🧶 How to Make a Double Crochet Stitch: Perfect your tension on the core stitch used in every granny square.
- 🎒 Beginner Crochet Tote Bag Pattern: Prefer a one-piece market bag without seaming squares? Try this seamless mesh tote.