Free Printable 3D Crochet Flower Pattern PDF
Get the printer-friendly 10-minute PDF pattern guide for our 3D Layered Flower! Perfect for beanies, bags, bookmarks, and garlands.
Looking for a quick, satisfying crochet project that takes under 10 minutes to make? This easy crochet flower pattern is one of the most versatile designs for makers of all skill levels. Whether you want to add a cute handmade embellishment to a cozy beanie, elevate a simple cotton tote bag, craft colorful hair clips, or string together a boho floral garland, this pattern is your go-to project.
In this step-by-step guide, you’ll learn how to crochet a gorgeous layered 5-petal flower using simple basic stitches: single crochet, double crochet, and slip stitches.
📋 Pattern Specifications & Multi-Size Yarn Matrix
One of the best parts of this easy crochet flower pattern is that you can scale its finished diameter from a tiny 1.5-inch hairpin accent up to a 4.5-inch statement coaster simply by changing your yarn weight and hook size—without altering a single stitch count!
| Flower Scale | Yarn Weight Category | Recommended Hook | Finished Diameter | Yardage Required | Best Project Uses |
|---|---|---|---|---|---|
| Micro Blossom | Lace / Crochet Thread #10 | 1.75 mm – 2.25 mm | ~1.25 in (3.2 cm) | ~5 yards | Earrings, bookmarks, baby headbands |
| Mini Dainty Flower | Sport (#2) or DK (#3) Cotton | 3.5 mm (US E-4) | ~2.25 in (5.7 cm) | ~10 yards | Hair clips, cardigan buttons, gift tags |
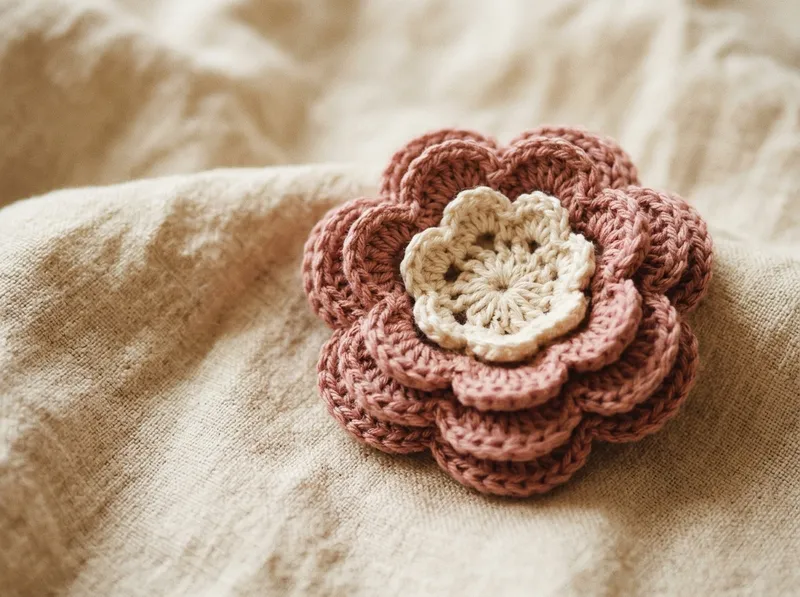
| Classic 3D Flower (Pictured) | Medium / Worsted (#4) Cotton | 5.0 mm (US H-8) | ~3.0 in (7.5 cm) | ~15 yards | Beanies, market tote bags, garlands |
| Jumbo Statement Bloom | Bulky (#5) or Super Bulky (#6) | 6.5 mm – 8.0 mm | ~4.5 in (11.5 cm) | ~25 yards | Mug coasters, throw pillow appliqués |
🧶 Recommended Materials & Tools
To make the Classic 3-Inch Flower pictured in our studio sample, gather these leftover yarn scraps and basic tools:
- Yarn: ~15 yards total of 100% Cotton or Cotton-Acrylic Blend Yarn (Medium Weight #4). You will need ~4 yards of Color A (Warm Cream) for the center core and ~11 yards of Color B (Soft Dusty Rose) for the petals.
- Crochet Hook: 5.0 mm (US H-8) ergonomic hook (or 4.5 mm hook if you want stiffer, self-supporting petals that stand upright without blocking).
- Tapestry Needle: Blunt large-eye steel yarn needle for weaving in ends and stitching the flower securely onto hats or bags.
- Scissors: Sharp embroidery scissors for flush trimming.
[!IMPORTANT] Why Cotton Outperforms Acrylic for Crochet Flowers: While you can use any scrap yarn in your stash, 100% Cotton (either mercerized for a subtle sheen or unmercerized dishcloth cotton for a matte finish) holds crisp curved petal edges, prevents fuzzing, and keeps its 3D petal lift even after repeated washing!
🔤 Crochet Abbreviations & US Terminology
This tutorial is written in standard US Crochet Terms:
- ch: Chain stitch
- sl st: Slip stitch
- sc: Single crochet (UK: Double crochet)
- hdc: Half double crochet (UK: Half treble crochet)
- dc: Double crochet (UK: Treble crochet)
- tr: Treble crochet (UK: Double treble crochet)
- flo / blo: Front loop only / Back loop only
- magic ring / circle: Adjustable starting loop
[!TIP] Alternative to the Magic Ring: If you are brand new to crochet and find the adjustable magic ring tricky, Chain 4, insert your hook into the very first chain you made, and work a slip stitch (sl st) to form a tiny ring. Work all Round 1 stitches directly through the center of that chain ring!
🌸 Step-by-Step Classic 5-Petal Flower Pattern
This signature design is worked in 2 quick rounds from the center outward. Because each petal begins and ends with a chain-2 arch anchored into the base ring, the petals naturally fan out into five distinct, rounded hearts without overlapping.
Phase 1: Round 1 — The 10-Stitch Center Core
- With Color A (Warm Cream), form a magic ring on your fingers.
- Insert your 5.0 mm hook into the ring, yarn over, and pull up a loop. Chain 1 (this locks the ring and does not count as a stitch).
- Work 10 single crochets (sc) directly into the center of the magic ring, working over both the loop and the short yarn tail.
- Grab the short starting tail and pull firmly until the center hole closes completely tight.
- Insert your hook under both top loops of the 1st single crochet you made and work a slip stitch (sl st) to join the circle. (Total: 10 sc stitches — 2 base stitches for each of our 5 petals!)
- Cut Color A leaving a 5-inch tail and pull the loop through to fasten off.
Phase 2: Round 2 — Sculpting the 5 Scalloped Petals
Notice how Round 1 has 10 stitches, and we want 5 petals. Each petal uses 2 consecutive stitches from Round 1 (1 stitch to anchor the starting slip stitch, and 1 stitch to hold the fan of double crochets):
- Insert your hook into any stitch of Round 1. Loop Color B (Soft Dusty Rose) onto your hook and pull through with a slip stitch (sl st) to join.
- Petal 1:
- Chain 2 (forms the right side wall of your petal).
- Work 3 double crochets (dc) all into the next stitch (or into the same stitch if you prefer slightly tighter spacing, then
sl stin the next st—let’s use the cleanest 2-stitch method: work 3 dc into the next stitch, then chain 2, and work 1 slip stitch (sl st) into that same stitch to finish the petal base, then slip stitch into the next stitch to move to the start of the next petal!). - Even Simpler Beginner Rhythm (2 Stitches Per Petal):
- In Stitch 1: Already joined with
sl st, now Chain 2, and work 3 dc into this exact same Stitch 1. - In Stitch 2: Chain 2, and work 1 sl st into Stitch 2!
- In Stitch 1: Already joined with
- Why this 2-stitch method is magic: Splitting each petal across 2 adjacent base stitches gives every petal twice as much horizontal room so your flower lies completely flat without buckling!
- Petals 2 to 5:
- Move to the next stitch (Stitch 3 of Round 1): Work 1 sl st, ch 2, and 3 dc all into that stitch.
- Move to the next stitch (Stitch 4 of Round 1): Work ch 2, 1 sl st into that stitch. (Petal 2 complete!)
- Repeat
*In next st work (sl st, ch 2, 3 dc); in next st work (ch 2, sl st)*three more times around the ring until all 10 stitches of Round 1 are used and you have 5 symmetrical petals.
- Fastening Off: Cut Color B leaving an 8-inch sewing tail. Pull the tail through your final loop and thread it onto your tapestry needle, bringing it through to the back of the flower.
🌺 Bonus Variations: 3D Double-Layered Flower & 6-Petal Daisy
Once you master the basic 5-petal blossom, try these two studio variations using the exact same foundation skills:
Variation A: Lush 3D Double-Tiered Rose Flower (Adds a Back Layer of Petals)
Want a thick, multi-dimensional flower with a second tier of larger petals peeking out from behind?
- When working Round 2 (the first 5 petals) above, work every stitch into the Front Loop Only (FLO) of Round 1! This leaves the 10 Back Loops (BLO) of Round 1 untouched on the underside of the flower.
- Without cutting your yarn at the end of Round 2, fold the front petals forward and insert your hook into the first unworked Back Loop on the underside of Round 1.
- Work
*In next BLO work (sl st, ch 3, 4 treble crochets [tr]); in next BLO work (ch 3, sl st)*5 times around the back loops! - The taller treble crochet petals frame the smaller front petals, creating an instant heirloom 3D bloom.
Variation B: 6-Petal Chamomile Daisy (Ideal for Coasters & Garlands)
- Round 1 (Yellow Center): Work 12 sc into a magic ring and join with a
sl st. (12 sts) - Round 2 (White Elongated Petals): Join white yarn in any stitch. Repeat
*In next st work (sl st, ch 3, 2 tr, ch 3, sl st); sl st in next st*6 times around. You will get 6 long, slender daisy petals!
🧵 How to Attach Crochet Flowers to Hats, Bags & Hair Clips
A common beginner frustration is sewing a crochet flower onto a beanie or tote bag only for the outer petals to flop downward. Use these three studio attachment rules:
- The Invisible Back-Ridge Stitch (For Beanies & Tote Bags):
- Thread your 8-inch petal yarn tail onto a tapestry needle.
- Instead of sewing only through the tiny center ring (which leaves the petals floppy), pass your needle up and down through the back horizontal bars halfway up each petal in a circular running stitch around the flower’s underside. This anchors the middle of every petal while leaving the scalloped edges free and 3D!
- Hot Glue & Felt Backing (For Alligator Hair Clips & Brooches):
- Cut a 1.5-inch circle of wool felt matching your petal color.
- Cut a tiny slit in the felt, slide the top prong of a metal alligator hair clip through the slit, and bond the felt circle to the underside of the crochet flower using fabric glue or low-temp hot glue. This hides all yarn knots and prevents metal clips from snagging hair.
- Stringing a Boho Floral Garland:
- Using matching cotton yarn, Chain 35 (for the hanging loop end), then work 1 sc into the back top loop of a flower petal, Chain 18, and connect the next flower! Space 8 to 10 flowers along the chain and finish with another Chain 35 tie.
🛠️ Flower Troubleshooting Guide
| Problem | Cause | Quick Fix |
|---|---|---|
| Center hole opens up over time | Magic ring tail was cut too short before weaving in. | Weave the magic ring tail in a complete circle around the inside of Round 1, then reverse direction through 3 stitches to lock it permanently. |
| Petals curl inward like a cup | Working the ch 2 and dc stitches with tight tension. | Relax your yarn hand on the petals, or go up 0.5 mm in hook size for Round 2 only. |
| Petals crowd and overlap | Putting all 5 petals into only 5 stitches instead of spreading across 10 stitches. | Verify you worked 10 sc in Round 1 and that each petal spans 2 full stitches of the center ring. |
❓ Frequently Asked Questions
What is the best yarn for crochet flowers?
100% Cotton (Weight #3 DK or Weight #4 Worsted) is the gold standard for crochet flowers. Unlike loosely spun acrylic, cotton doesn’t halo or pill, shows every petal curve sharply, and holds up to steam blocking.
How do I stiffen crochet flowers for ornaments or jewelry?
If you are making floral earrings, bookmarks, or standing bouquet stems, dip or spritz the finished cotton flower with a 50/50 mixture of clear PVA school glue and warm water (or liquid fabric starch), shape the petals on a foam board with rust-proof pins, and let dry overnight.
Can I crochet a stem and leaf for this flower?
Yes! Simply wrap green cotton yarn around a 12-inch floral wire stem (securing the ends with a drop of hot glue) and thread the wire through the center magic ring of your flower.
🔗 Essential Related Crochet Tutorials
- 🧶 How to Make a Magic Ring (Magic Circle): Step-by-step photo guide to mastering the adjustable loop used to start Round 1.
- 🎒 Beginner Crochet Tote Bag Pattern: Crochet the sturdy cotton market bag that pairs with this floral appliqué.
- 🧶 How to Make a Double Crochet Stitch: Master the tall stitch that shapes each curved flower petal.
- 🧶 How to Make a Single Crochet Stitch: Learn the foundational stitch used for the flower center.
- 💡 Cute Crochet Gift Ideas: Discover 15 quick handmade gift patterns and scrap-yarn ideas.